Thursday, June 30, 2011

Kindergarten Graduation Card

We were invited to a shared graduation party last weekend for a girl exiting 8th grade and one that completed kindergarten. For the younger girl, I made the following card.


The bear comes from The Angel Company's retired Birthday Bear stamp set. To make it graduation worthy I drew in the cap and the diploma, which was an awesome suggestion given to me by my Create A Bunch at Lunch group.

The bear is colored with Copic Markers E: 25, 29 and 35 and the red is R24 and 27 and the shadow is C1. The border on the side is a Fiskars punch, Treading Water, and I used a star button punch to punch stars where the original circles were.

Tuesday, June 28, 2011

Floral Stripe Birthday

Once I played with the sketch of the thrifty stripe masculine birthday card, I decided to use the same technique to use up some floral scraps and make a birthday card.


This one uses scraps from The Angel Company's Whimsy Blossom paper collection, with a flower cut on the Cricut from the Walk In My Garden cartridge out of TAC's Mia's Cottage paper. The sentiment is from the retired Wishing You stamp set.

Sunday, June 26, 2011

Miranda

This card is one I made with my new Whiff of Joy stamp, Miranda. I made the card because I felt like coloring, but the image was so big, I wasn't sure how I was going to like it. I matched it up to some scraps I had of The Angel Company's A Little Whimsy collection and once it was finished, it turned out to be one of my favorites. When it took it into The Art House for the sale rack, the owner there really liked it too. In fact, I think she might have bought it for herself right after I left. If it's there when I stop in next time, I'll be surprised.


Miranda is colored with Copics (of course) Skin: E000, E00, E01, Jeans: B00, B01, B02, Shirt: R83 and R85, Flowers: RV23, RV25 and RV29 (with Crystal Lacquer on top of the flowers to give them some dimension), Leaves and Grass: YG11, YG61 and YG63, Headband: V20 and V25, Hair: E23, E25, E27 and E29 and Wings C00 and C01.

Thursday, June 23, 2011

Floral Birthday Card

This is a card I made just so I could have some birthday cards on hand. The paper is from The Angel Company's Whimsy Blossoms paper collection with some generic ribbon I had on hand. The sentiment is from The Angel Company's Trendy Greetings stamp set, stamped on a panel made with the Labels 20 Nestabilities set, and stippled with green and then edged with a Copic marker. I used some pearls that I got at the convention in Ohio in April.

Tuesday, June 21, 2011

What's Up Chick?

This chick notecard was the second project we made at my Create-A-Bunch-At-Lunch class in May, and was one of the items on my display board at Rita's gathering. I saw it on Splitcoast Stampers around Easter time, but thought it would be fun with sayings like "Shake Those Tail Feathers", "Chick, Chick Hooray" or "Honey, You're No Spring Chicken" from The Angel Company's Tail Feathers stamp set.


The note card is made with two large scalloped circles stapled together in the upper right corner, and two 5-point flowers. One covers the staple, and the other is cut to make the feet and beak. The eyes are made from two white 5/8 inch circles and one yellow 5/8 inch circle cut in half for the eyelids. The pupils are from one of those old hand punches that were once considered "office supplies".

Sunday, June 19, 2011

Rock Star Card for Father's Day

Happy Father's Day to all the wonderful Dad's out there.

This is another masculine card that we created during the Create-A-Bunch club this month. This card uses strips of paper from The Angel Company's Just Like Dad paper collection surrounded by various sized stars cut with the Cricut. Both of the solid green stars are scored and popped up for some dimension and interest. The sentiment is from Taylored Expressions My Hero stamp set.

Thursday, June 16, 2011

Thrifty Masculine Stripe Card

This card came from the idea I saw on the Poetic Artistry blog, which in turn came from Verve's Mojo Monday sketch challenge. I thought it was a great way to use up extra scraps, and since I've been using a lot of The Angel Company's Just Like Dad paper, had lots of scraps.


This card uses four 1-inch wide strips of paper rounded at the end and edged with Spanish Olive Versa Magic Ink. I used one of the extra stars I cut with the Gypsy for the focal point, and I scored the star so that it would look popped up (which it is). The sentiment is from The Angel Company's retired Wishing You stamp set.

Tuesday, June 14, 2011

Masculine Birthday Card

This is a masculine card I prepared for our Create-A-Bunch club. I found the paper at Pat Catan's in Ohio when I visited in April and thought it would be perfect with large eyelets. This is also the card that uses the oval from the George and Basic Shapes Cricut cartridge amended with the Gyspy that I mentioned in my post on Saturday so that it would fit into the Spellbinders Fancy Tags die.


The ribbon is from Michael's, the eyelets are Antique Brass that I got through The Angel Company and the sentiment is from The Angel Company's Thinking of You stamp set.

In case you were wondering, this is what the unaltered oval from George and Basic Shapes looked like.

Sunday, June 12, 2011

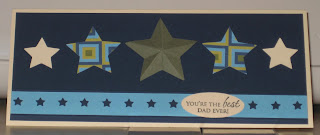
Best Dad

This is a card I made for the Taylored Expressions sketch challenge this week.


My card uses The Angel Company's Just Like Dad paper collection, and Taylored Expression's Boys Will Be Boys stamp set.

Saturday, June 11, 2011

Finally got my Gypsy to work!

I'm so excited! I got a Gypsy for Christmas (to go with my Cricut), and only this week got it to work. Partly because I didn't have any time to devote to it, but mostly because every time I started, I got frustrated because the manual writers knew too well how the product worked by the time they wrote the manual, and are forgetting that most of us that have purchased the product have no idea how to make it work. I had lots of trouble with vague wording like "Cricut device" as used in "plug the Cricut device into the computer". My assumption was that Cricut device is the Cricut cutter (since I knew that had to be updated), but they meant Gypsy. When I wrote technical support to ask, and to say that no combination of cords seemed to work to plug the Cricut cutter into the computer, I got these wonderful trouble shooting tips: "plug the go into the wall, and then plug the g into the computer" What????? I can only assume that they didn't feel like writing out the word Gypsy, so they used "g", except that the second word in the sentence was supposed to mean "g" for Gyspy, not go.

When I finally figured out that the Gypsy was what was supposed to be plugged into the computer the direction was "when on the welcome screen, plug the Gypsy to the computer". Except that apparently when you have a new Gypsy, you have two welcome screens. The first is where you calibrate the machine with the stylus and then accept the terms and conditions. Then there's a second welcome screen that you get every time you turn the Gypsy on after that. So since I hadn't done anything with the machine except turn it on and plug it into the computer, without calibrating the stylus or getting the next screen, my computer kept saying it "couldn't find the device". After I accidentally bumped the Gypsy and went through he calibration and acceptance, the computer was able to find the device just fine from the second welcome screen. Ugh!

But now it works, and I have spent a little time playing with it. I created pages of stars for some cards we were going to make in the CBL class, without wasting a bunch of paper (outside of the fact that I got more stars than I needed, so you'll probably see lots of cards with stars in the next bunch of posts. Good thing it's getting near to Fourth of July.)

My favorite thing though was changing the shape of the oval that came with the George and Basic Shapes cartridge. I got the Spellbinders Fancy Tags die cut set, and found that I didn't have an oval that would go inside the one tag. I was able to change the shape of the oval to match the tag (.85 inches wide by 1.75 high). Very cool! I will have to play with it more, but now that I got it set up, I love it!

Friday, June 10, 2011

We all Punch? for Ice Cream!

Last month, I went to Rita Kegg's awesome Angelic Impressions gathering. Rita created all kinds of projects for us to do, from simple and quick cards, to things that took a little more time, but were still easy enough. We spent two creative days at beautiful Punderson Manor in Ohio, and this was the first time I've ever attended any gathering where I finished all the projects before I left!

Before the gathering, I told Rita that I would do a demonstration on punch art. I created a display board of several ideas, and then demonstrated three things. One of the things I demonstrated was an ice cream sundae in a bowl. I made an ATC card to be traded that was blank, and after the demonstration, everyone made their own ice cream to put on it, and Rita incorporated the ATC into one of the cards we made.

But even before that, I created this card that my Create-A-Bunch-At-Lunch class made.


Here are the pieces you need to punch out to make the ice cream sundae: a 1 1/2 inch circle with a crescent punched out of it by the same punch for the bowl, 2 pink 5/8 inch circles, 2 white 5/8 inch circles, 1 light brown 5/8 inch circle and 1 dark brown 5/8 inch circle. The toppings are made by putting three of the 5/8 inch circles a little more than half way into a scalloped square punch and punching. Chirstmas Red Stickles were used to make the cherries.


The circle surrounding the sundae is a Nestability die, the background is embossed with the Cuttlebug Swiss Dots embossing folder, and the sentiment is from Taylored Expressions, stamped in Noir Palette ink.

This is the card Rita created for the gathering made from my ATC trading card.


Check back later for more punch art ideas from my display board.

Tuesday, June 7, 2011

Mother's Day Flowers

This is the card I created for my Create-A-Bunch Club to make for Mother's Day. My sample also used the Rock 'N Roll technique, but because we were running short on time, they didn't bother re-inking the edges with darker colors. My inspiration for this card came from a t-shirt I saw at Kohl's.


All stamped supplies on this card are made with products from The Angel Company and all ink is Versa Magic. The lightest layer of the card background is the Damask Backgrounder stamp using Wheat ink with Sage as the edging; the second background layer uses Script Background inked with Perfect Plumeria ink; the greenery below the flowers is from the Be of Good retired hostess set, stamped in Hint of Pesto and the flowers are from the retired Fanciful Flowers set inked with Maulted Mauve with the edges rolled in Perfect Plumeria. The Happy Mother's Day sentiment is from the Trendy Greetings stamp set and is inked in Hint of Pesto.

I think this card has the most stamping layers of any card I've ever done, and is the closest I'll get to collage, since I usually don't pull collage off very well.

Sunday, June 5, 2011

Rock 'N Roll Technique on Thank You Card

This is a card I made using the rock 'n roll technique, where you load up your stamp with a lighter colored ink, and then use a second, darker, ink around the edges. This card shows the technique particularly well since I used a light blue ink for the interior and a brow ink for the edge.

This card did double duty. I used it as my project for the Madison Mingle in March and then again with my Create-A-Bunch Club in April.


The card uses The Angel Company's Damask Backgrounder stamp and the sentiment is from the Thinking of You set. The ink is Versa Magic Sea Breeze and Gingerbread.

Thursday, June 2, 2011

Little Art Girl

In March, a friend and I went to Ohio to visit another friend and attend the Adventures in Stamping Expo. We did LOTS of shopping and took some classes, and I helped my friends prepare for the Copic class they were giving. Amazingly enough, we also had some time to play. Not a lot, but at least a little.

While we were playing, I stamped off this image from one of my friends' stamps and colored her in. This girl reminds me of so many I know, including myself, that love to sit and draw. I haven't decided what I'm going to do with the image over all, perhaps nothing. I may just keep her in my art room as a reminder.


My little art girl is colored with Copic markers. her hair is E27, E25 & E23, her skin is E00, E000, E0000 & E11, the jeans are B34, B37 and B00 with the the colorless blender 00 to lighten, the cuffs are B34 & B91, her shoes are C3, C5, C7 & C9, the shadows are C00 and C02 and the pencils and cup are Y35, and &38.