Sunday, September 18, 2011
Green and Pink Happy Birthday
This is a card that uses more scraps. The bottom, green panel is embossed with the Sizzix Flowers embossing folder. Scraps from Basic Grey's Sweet Pea/Alyssa collection are layered on top, with a border cut from Spellbinders' Fleur De Lis border die. The sentiment panel is cut from Spellbinders' Fancy Tags Three Shapeabilities set. The sentiment is from The Angel Company's Trendy Greetings and the panel is bordered with Crystal Stickles. I cut the green swirl from the Basic Grey paper and used some butterfly punches to move the eye along.
Tuesday, September 13, 2011
Welcome Jack - Vintage Baby card
One of the attorneys in my office commissioned me to make "the most beautiful baby card, customized with the name Jack". I actually gave this a try one night and came up with a result that I didn't care for at all. It certainly didn't qualify as the most beautiful baby card. I found a vintage carriage an decided to go that route. My style is decidedly not vintage, so I did some blog hopping and took some inspiration and a sketch from the Just Give Me Stamps blog where Julie does beautiful vintage work.
My card uses "solid" paper from the My Mind's Eye, 29th Street Market paper collection (Peaceful Dream - Consciousness/Dreamy paper pattern), and patterned paper from Heidi Grace Designs', Shimmer Glitter Paper, Tendril Vines. The baby carriage is Hampton Art's Carriage stamp, stamped in Burnt Umber Palette ink, and the image panel is sponged with Ballet Blue Palette ink. Because I don't usually do vintage, I had to spray some white lace, and cream ribbon with Tattered Angel's Crushed Shells spray. I stamped the ribbon with "welcome" from The Angel Company's Laughter Hostess set. I added a flower and button from Making Memories' Ava Buttons and Blossoms collection and cut out the word "Jack" from the Cricuit Platin Schoolbook cartridge.
Sunday, September 11, 2011
Flower Pattern Kindness Card
In my endeavors to clean up the desk by using scraps, I got side tracked. I still had the pad of Bo Bunny paper out that I used in the "Treasured Friends" posts from July. As I flipped through the pad, I saw this basically white pattern with little flowers that had been one of my favorites when I got the paper pack. I found that the perfect accents for it were black, and a light green paper that I'd never used before. This is my result. I love how the black pops the pattern right off the light green, making this one of my favorite cards in a while.
This card uses a Martha Stewart border punch on either side of the patterned paper panels. The sentiment comes from The Angel Company's Kindness stamp set. The flower was cut from Spellbindeers' Flower Creations Shapeabilities die, embossed and inked with Claret Palette ink and outlined with Crystal Stickles. The black swirl behind the flower is a partial image cut on the Cricuit using the Damask Decor cartridge.
Thursday, September 8, 2011
Amberly Grace Flower for a Friend
Using something several times is the surest way to remember it. So here is a third card I made using Heartfelt Creations' stamps and matching Spellbinders dies.
This card utilizes The Angel Company's Amberly Grac paper collection. The background is distressed and edged with Gingerbread Versa Magic ink. The flower is Heartfelt Creations' Innoscents Flowers chalked in blue with a glitter border. The edge design is Spellbinders' Fleur De Lis, cut, embossed and inked with Ocean Depth Versa Magic ink. The sentiment panel is cut from Spellbinders' Beaded Circles Nestabilities die, also embossed and inked with Ocean Depth Versa Magic ink. The sentiment itself is from The Angel Company's Tag Tidbits set.
Labels:
Cards,
Heartfelt Creations,
Miscellaneous,
Spellbinders,
T.A.C.
Tuesday, September 6, 2011
Blossom Birthday
This is another card I made using Heartfelt Creations stamps with matching Spellbinders dies.
This card uses The Angel Company's Juliette paper collection and matching ribbon. The background is embossed with one of Stampin' Up's Sizzix folders. The sentiment is T.A.C.'s from Trendy Greetings stamped in Burnt Umber Palette ink. The border at the bottom is a Martha Stewart border punch. The flowers are stamped from Heartfelt Creations' Flora Grande stamp set, cut with Spellbinders' Blossoms 3 Nestabilities, with a coffee ground and glitter center.
Sunday, September 4, 2011
Birthday Sunflowers
Last spring at the Adventures in Stamping show, I bought several stamp sets from Heartfelt Creations that had matching Spellbinders Dies for cutting them out. There was a demo at the booth that showed how to make a template to line up with the stamped image so that the cutting came out just right. I finally got a chance to play around with those stamps and die cuts.
This card is made from brown, yellow and turquoise solid papers. The turquoise panel is embossed with the Dot embossing folder by Darice. The sentiment panel and mat are cut from Spellbinders' Labels Nine Nestabilities and the flowers are Aztec Gold Sunflowers by Heartfelt Creations cut with Spellbinders' Blossom 2 Nestabilities. The flowers and sentiment panel are accented with chalk. For the centers of the flowers I used leftover, dried out, coffee grounds mixed with glitter. The sentiment is from The Angel Company's Trendy Greetings stamp set.
Labels:
Birthday,
Cards,
Heartfelt Creations,
Spellbinders,
T.A.C.
Thursday, September 1, 2011
Tulip Spray Birthday
This is another birthday card using Basic Grey Sweet Pea/Alyssa scraps from my table. The tulips are from The Angel Company's Floral Trio and the sentiment is Stamping Sensations' Thoughts Just for You #2. The tulips are colored with Copic markers RV32, RV34, G21, G24 and the ribbon is YR23.
Labels:
Birthday,
Cards,
Copic Markers,
Stamping Sensations,
T.A.C.
Tuesday, August 30, 2011
Best Wishes in Burgundy
I was doing some web surfing recently and saw a card that really inspired me, both in color and sketch. I played around with it a little bit and created something a little different.
This card uses Core'dinations cardstock with the core being lighter than the surface. I cut out two shapes on the Cricuit from the Lacy Labels cartridge (one for the panel and one for the mat), changing the size and dimension with the Gypsy. I ran the smaller piece through the Big Shot in the Cuttlebug Swirls folder and then sanded to bring out the lighter color. The scalloped circle is Nestabilities Heart Circle. The sentiment panel is stamped with a solid circle with swirl from Raisin BOAT's Symphony for the Soul stamp set, and the Best Wishes Sentiment is from The Angel Company's Rejoicing With You stamp set in Maulted Mauve Versa Magic Ink. The swirl is highlighted with a clear glitter pen and some butterflies were punched to bring the eye to the right.
Labels:
Cards,
Cricut,
Raisin BOAT,
Spellbinders,
T.A.C.,
Wedding
Sunday, August 28, 2011
A Little Whimsy Birthday
I was trying to use up some scraps that were laying on my desk, in an effort to actually see the surface. One of the things I had laying on the desk was the scalloped panel I created in the spring as part of my trade for Rita's gathering. These were the ones that were made to go with the ice cream punch design I was demoing, and there were some extras left over. After looking in my collection, I thought it would be fun to match it up with some other scraps of paper from TAC's A Little Whimsy paper collection. This is what I came up with.
The cake is from TAC's Let's Party set, colored with Copic markers. The cake is E57, and E59 with frosting in R83 and R85. The candles are YG11 and YG61, and YR32 and YR38 with a hint of Orange Peel Stickles. The scalloped panel comes from the Preserves Cricuit cartridge, amended in size on the Gypsy and then run through the Cuttlebug for embossing. The right side of the card was scored on the Scor-Pal.
Thursday, August 25, 2011
Hanging up the wings, but not the memories
This week, The Angel Company announced that they're closing up their doors; hanging up their wings so to speak. It's a shame that so many people and small businesses have been hit so hard by this economy. I truly enjoyed my time as an angel. I loved going to seminar, meeting new people, making new friends and keeping up with old ones, getting inspired, and learning new techniques. I have made many friends through TAC, and I fully expect those friendships will continue, as will my own personal creative journey.
For anyone wondering, I have no plans to join a new direct selling company. Most people who know me, know I'm not a sales person. Monthly sales goals aren't for me, which was made TAC the perfect fit. That being said, I still plan to have Stamp With Me nights so friends can get together and have a good time and maybe get a little stamping done, and I'll still have classes and sell things I've created to supplement my obsession, because the social part was what I enjoyed most. And of course, I'll continue to post things I create to my blog.
It was a wonderful flight. Now it's time to see where the next current takes me.
Thursday, August 18, 2011
Hang In There
A former co-worker (who is now a client) recently got a promotion at her job. She's understandably a little nervous, since the new position has a LOT more responsibility, although I'm sure she can tackle it with flying colors. This is the card I made for her to let her know that I'm thinking of her, and that even though it's a daunting job, I know she can do it.
This card uses The Angel Company's retired Four Fab Frogs set. I colored the image panel with Copic markers. The frog is in G21, G24, G28, YR20 and YR23. The branch is E57 and E59 and the stippled sky is BG10 and BG11. The frog's eyes are also BG11. The "hang in there" sentiment is from Stamin' Up's old Mini Mates stamp set.
Labels:
Cards,
Copic Markers,
Miscellaneous,
Stampin Up,
T.A.C.
Tuesday, August 16, 2011
Black and White Wedding Card
Tom and I went to one of his co-worker's wedding this weekend. This is the card I made for her and her new husband.
This card is simple black and white. The border punch at the bottom is a Martha Stewart punch. The medallion comes from the Cricuit Damask Decor cartridge and the swirls are the from the Monarch set that doesn't have a company name on the packaging. The bling at the top was added last minute, which I guess was a good addition, because it was what my husband said he liked when he saw the card.
Sunday, August 14, 2011
Miscellaneous Flower Card
I really liked the look of the Treasured Friend post last month, and I got lots of compliments on that card, so I decided to use the same scraps to make one that was very similar, but a little different.
This card uses Taylored Expressions' Discover Your Wings stamp set inked in Mango Madness, Jumbo Java and Hint of Pesto Versa Magic ink, laid out on a scrap of the same Bo Bunny paper used last month and accented with more Grass Green pearls.
Thursday, August 11, 2011
Another Vintage Birthday Card
I seem to have accumulated a lot of scraps on my craft table, so I'm trying to use some of them up. This card is made from scraps of the Basic Grey Sweetpea Alyssa paper that I used on the CBL's Vintage Birthday card post last month.
The sentiment is from Stamping Sensations, Thoughts Just for You #1 stamped in Black Momento ink, over a swirl from a clear stamping set that I got somewhere. I don't know the company name, but the name of the set appears to be Monarch. The swirl is in Sage Green Versa Magic ink. The pointed flower at the corner are stamped from a Heartfelt Creations set meant to be used with the Blossoms 2 Nestabilities and the rounded ones come from a punch. I gave them a little umph by coloring part of them with the RV95 Copic marker and adding Cinnamon Stickles to the centers. The smaller ones are edged in Jumbo Java Versa Magic ink. The ribbon is from Michael's Christmas ribbon sale bin.
Labels:
Birthday,
Cards,
Heartfelt Creations,
Spellbinders,
Stamping Sensations
Tuesday, August 9, 2011
50th Anniversary
Last week my husband and I were lucky enough to attend his Aunt and Uncle's 50th Anniversary. It's such an inspiration to see couples that have been together for 50 years and have weathered the bad patches and celebrate the good. We had a great time. This is the card I made for them.
This card uses off-white linen paper embossed with the Cuttlebug Swiss Dots folder with Encore Gold Ink brushed around the edges. The medallion is from the Cricuit Damask Decor cartridge laid on a background of gold paper and stamped and heat embossed with a gold 50. There is a further band of off-white linen cut with a large Martha Stewart border punch wrapped with a shear gold ribbon.
Sunday, August 7, 2011
3D Lilly
It's been a busy week, so no posts, but here's something to make the wait worth while. A co-worker has had a 3D Lily card on her bulletin board for a long time, and every time I saw it, I thought, I should figure out how to do it. I finally asked her if I could borrow it, and brought it home to play with. 4 hours later, I came up with a reasonable likeness. Nothing as commercial as hers was, but still pretty cool.
The flowers and leaves are cut from the Cricuit. The leaves are from Walk in My Garden and welded together on the Gypsy. I don't remember if I picked a flower from Walk in My Garden or another cartridge. I spent a lot of time looking for the one that would work best. The flower is stippled with Sunflower and Iris Palette ink, and the leaves are Water Lilly Green. There are three flowers, one folded in half and two that are folded more and taped so they spring open when the leaves are pulled. The funny thing about it is that although it's basically the same fold, every flower ended up different, so it wasn't something I could duplicate over and over (which is part of the reason why the CBL won't be making this card).
Overall, it's still a really neat card, and I have a friend that has a penchant for cards that fold or have moving parts, so I gave it to her for her birthday.
Thursday, July 28, 2011
Happily Ever After
When I made the civil union card from my prior post, I actually created two cards, since I wasn't sure what kind of look my friend was going for. This was the second card I made for her to choose from (except this card originally had a blue circle cut from the same Circle Hearts Nestabilities die, and the white panel I ultimately put on the pink card, could have been layered onto the circle hearts, had it been her choice). When she chose the other one, I brought this one home, and kept thinking that it needed a castle to go with the happily ever after theme. I found this castle in a set of Disney stamps someone had given me and changed up the card to match the theme.
Tuesday, July 26, 2011
Vintage Birthday
The Create A Bunch at Lunch group asked me for more feminine birthday cards, so this month, we did the one from my last post, and this pink and green one.
This card uses some old Basic Grey paper from the SweetPea Jack Collection that I had in my stash. I used my Cricut Gypsy to amend a label from the Lacy Labels cartridge to fit the size I wanted for the card, and cut some flowers from the Walk in My Garden cartridge as well. The sentiment panel, with the Happy Birthday greeting from The Angel Company's Trendy Greetings stamp set, is layered over a pretty pink ribbon I got from Michael's on Black Friday last year when they were all 75% off.
Sunday, July 24, 2011
More Tulips
In a prior post, I had submitted a purple and green tulip card that I made for a friend's birthday, and said it might amend it a little bit for my Create A Bunch at Lunch group. Well, here is the amended card.
This card uses cheery red and yellow. The white background panel is sprayed with a yellow watercolor mist. The flowers are stamped with The Angel Company's retired Dancing Tulips stamp. The flowers are stamped in Pearlescent Poppy Brilliance ink, and the leaves are Pearlescent Thyme Brilliance ink. This time I stamped them more in the middle of the card, and placed a ribbon directly below the flowers. Stamping the flowers in the middle left room at the bottom for the Happy Birthday sentiment from The Angel Company's Ordinary Greetings stamp set.
Thursday, July 21, 2011
Pink and Green Flower Card
This is a card I made for a friend's birthday, before I came up with another one that I thought suited her better.
This card uses some scraps of Colorbok's Baby Girl Stripes that I had left over from some unconventional Christmas cards I did last year (and never got to post because things were so crazy). The image panel is stamped with The Angel Company's retired Fanciful Flowers stamp. The leaves and stems are in Versa Magic Sage ink and the flowers use the rock n roll technique and Versa Magic Pixie Dust darkened with Pink Grapefruit ink and highlighted with Crystal Stickles. I also found that Paper Trey's New Leaf Ribbon matches exactly with Queen & Company's Grass Green pearls.
Tuesday, July 19, 2011
Civil Union Card
One of my friends from the office commissioned me to create a civil union card for a ceremony she was attending this week. She figured it would give me a challenge and it would provide her with a card she was unlikely to find in a shop. The one qualification I had was that it had to be sized properly to hold money.
This is the card I came up with. It uses both sides of some double-sided K & Co. paper I had in my stash. I also got a chance to use one of my newer Martha Stewart border punches, and the Heart Circles Nestabilities dies. I used my Cricut to cut two engagement rings from the Wedding/Marriage cartridge.
Sunday, July 17, 2011
Sweet Pea Garden Card
One of my favorite attorneys in my office had a big birthday the other day. Her assistant was making a big deal out of it with a gift on the 15th of each month preceding the actual birthday on July 15th, things like a gift certificate to get her nails done one month, and flowers on another. I don't remember what all. She wanted to culminate it with cards from everyone in the office. This is the card I made for her.
It uses Paper Trey's Sweat Pea stamp colored with Copic markers. The flowers are RV02 and RV04, the leaves are G21 and G24 and the background is B0000, B00. All of which is blended with the colorless 0 Blender which was laid down before the coloring began on each section. The green paper is from a St. Patrick's Day collection that a friend gave me, and the border is punched with a Martha Stewart border punch.
The inside of the cards uses a sentiment from DRS and a scrap of the green paper punched again with the Martha Stewart border punch.
Labels:
Birthday,
Cards,
Copic Markers,
Miscellaneous,
Paper Trey
Thursday, July 14, 2011
Purple Wedding Card
One of my co-workers got married recently, so I made this card. It's a little strange to me, because I usually use wedding images, or black and white for weddings, but this one seemed to need something very quick, with color.
The background is stamped with The Angel Company's Damask Backgrounder stamp in Lavender Sachet Palette ink, and the sentiment panel uses my new Spellbinders Fancy Tags 2 dies that I got for my birthday. The sentiment is from TAC's retired Elegant Greetings set.
I made the card the night before I needed it, and took the picture in the copy room at work, so the lighting is horrible.
Tuesday, July 12, 2011
Just A Note
I had some fun just playing a little and came up with this card that uses the Quarter Note Cricut cartridge and music note border punch I got for my birthday. I layered these on top of a grey panel that was embossed with the Allegro Cuttlebug embossing folder and a sentiment panel cut from Spellbinders Labels 2 dies which I stippled with Malted Mauve Versa Magic ink and stamped with The Angel Company's Flourishes stamp set and Just a Note from their Trendy Greetings stamp set.
Saturday, July 9, 2011
Happy Birthday to a Trasured Friend!
This is a card I made for a friend whose birthday I didn't forget, but I was traveling that day and I didn't call or even text. I know, bad friend! But we were able to get together recently and I gave her this card then.
It uses Bo Bunny paper as the background and a scrap of pumpkin that I had in my scrap bin (I'm trying more and more to use those scraps up). The image panel is stamped with a partial image from Taylored Expressions' Discover Your Wings set inked with Hint of Pesto, Sea Breeze, Pumpkin Spice and Gingerbread Versa Magic ink. The sentiment is from The Angel Company's retired Here's To You stamp set, and fit the space perfectly. The image panel is accented with a few Grass Green pearls.
Wednesday, July 6, 2011
Dancing Tulips
This is a quick and easy card a made for a friend for her birthday. In fact, it's quick enough that I may use a variation of it for the Create a Bunch Club this month.
I was basically able to use scraps I had on hand for the green and purple layers. The image panel is stamped with The Angel Company's retired Dancing Tulips stamp set using Versa Magic Aloe Vera for the stems and combining Spring Pansy and Purple Hydrangea for the flowers. It seemed too empty at the top, so I added some lavender pearls to try to fill it out.
Monday, July 4, 2011
Happy 4th of July!
This is a card I made from a sketch on Heather Scott's blog, Oz-somestamps.
The card uses the same American flag paper that I used in the Kindergarten graduation card. Truth be told, I made this card first, and then used the scraps to make the graduation card. This one was quick and easy to put together with the accent of the stars and oval left over from my gypsy cutting a while back ago.
Saturday, July 2, 2011
Happy Anniversary
Tom and I have some friends that share our anniversary (today), albeit a few years later. Every year I try to make them a 4th of July themed anniversary card. This is the card I came up with this year.
The paper is Patriotic Burst from The Paper Studio coupled with stamped stars from Stampin' Up's old Stars and Swirls stamp set and a sentiment from The Angel Company's retired Greetings stamp set. I used a scrap of blue paper, punched with the Fiskar's Treading Water border punch with punched out red stars glued to each of the scallops.
Our friends are coming down from Milwaukee to have dinner with us at The House of Blues Foundation Room and should be en route now. Hopefully she hasn't looked at my blog on her smart phone during the ride down.
Thursday, June 30, 2011
Kindergarten Graduation Card
We were invited to a shared graduation party last weekend for a girl exiting 8th grade and one that completed kindergarten. For the younger girl, I made the following card.
The bear comes from The Angel Company's retired Birthday Bear stamp set. To make it graduation worthy I drew in the cap and the diploma, which was an awesome suggestion given to me by my Create A Bunch at Lunch group.
The bear is colored with Copic Markers E: 25, 29 and 35 and the red is R24 and 27 and the shadow is C1. The border on the side is a Fiskars punch, Treading Water, and I used a star button punch to punch stars where the original circles were.
Tuesday, June 28, 2011
Floral Stripe Birthday
Once I played with the sketch of the thrifty stripe masculine birthday card, I decided to use the same technique to use up some floral scraps and make a birthday card.
This one uses scraps from The Angel Company's Whimsy Blossom paper collection, with a flower cut on the Cricut from the Walk In My Garden cartridge out of TAC's Mia's Cottage paper. The sentiment is from the retired Wishing You stamp set.
Sunday, June 26, 2011
Miranda
This card is one I made with my new Whiff of Joy stamp, Miranda. I made the card because I felt like coloring, but the image was so big, I wasn't sure how I was going to like it. I matched it up to some scraps I had of The Angel Company's A Little Whimsy collection and once it was finished, it turned out to be one of my favorites. When it took it into The Art House for the sale rack, the owner there really liked it too. In fact, I think she might have bought it for herself right after I left. If it's there when I stop in next time, I'll be surprised.
Miranda is colored with Copics (of course) Skin: E000, E00, E01, Jeans: B00, B01, B02, Shirt: R83 and R85, Flowers: RV23, RV25 and RV29 (with Crystal Lacquer on top of the flowers to give them some dimension), Leaves and Grass: YG11, YG61 and YG63, Headband: V20 and V25, Hair: E23, E25, E27 and E29 and Wings C00 and C01.
Thursday, June 23, 2011
Floral Birthday Card
This is a card I made just so I could have some birthday cards on hand. The paper is from The Angel Company's Whimsy Blossoms paper collection with some generic ribbon I had on hand. The sentiment is from The Angel Company's Trendy Greetings stamp set, stamped on a panel made with the Labels 20 Nestabilities set, and stippled with green and then edged with a Copic marker. I used some pearls that I got at the convention in Ohio in April.
Tuesday, June 21, 2011
What's Up Chick?
This chick notecard was the second project we made at my Create-A-Bunch-At-Lunch class in May, and was one of the items on my display board at Rita's gathering. I saw it on Splitcoast Stampers around Easter time, but thought it would be fun with sayings like "Shake Those Tail Feathers", "Chick, Chick Hooray" or "Honey, You're No Spring Chicken" from The Angel Company's Tail Feathers stamp set.
The note card is made with two large scalloped circles stapled together in the upper right corner, and two 5-point flowers. One covers the staple, and the other is cut to make the feet and beak. The eyes are made from two white 5/8 inch circles and one yellow 5/8 inch circle cut in half for the eyelids. The pupils are from one of those old hand punches that were once considered "office supplies".
Sunday, June 19, 2011
Rock Star Card for Father's Day
Happy Father's Day to all the wonderful Dad's out there.
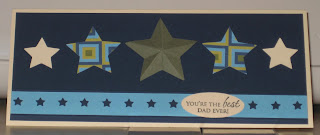
This is another masculine card that we created during the Create-A-Bunch club this month. This card uses strips of paper from The Angel Company's Just Like Dad paper collection surrounded by various sized stars cut with the Cricut. Both of the solid green stars are scored and popped up for some dimension and interest. The sentiment is from Taylored Expressions My Hero stamp set.
Thursday, June 16, 2011
Thrifty Masculine Stripe Card
This card came from the idea I saw on the Poetic Artistry blog, which in turn came from Verve's Mojo Monday sketch challenge. I thought it was a great way to use up extra scraps, and since I've been using a lot of The Angel Company's Just Like Dad paper, had lots of scraps.
This card uses four 1-inch wide strips of paper rounded at the end and edged with Spanish Olive Versa Magic Ink. I used one of the extra stars I cut with the Gypsy for the focal point, and I scored the star so that it would look popped up (which it is). The sentiment is from The Angel Company's retired Wishing You stamp set.
Tuesday, June 14, 2011
Masculine Birthday Card
This is a masculine card I prepared for our Create-A-Bunch club. I found the paper at Pat Catan's in Ohio when I visited in April and thought it would be perfect with large eyelets. This is also the card that uses the oval from the George and Basic Shapes Cricut cartridge amended with the Gyspy that I mentioned in my post on Saturday so that it would fit into the Spellbinders Fancy Tags die.
The ribbon is from Michael's, the eyelets are Antique Brass that I got through The Angel Company and the sentiment is from The Angel Company's Thinking of You stamp set.
In case you were wondering, this is what the unaltered oval from George and Basic Shapes looked like.
The ribbon is from Michael's, the eyelets are Antique Brass that I got through The Angel Company and the sentiment is from The Angel Company's Thinking of You stamp set.
In case you were wondering, this is what the unaltered oval from George and Basic Shapes looked like.
Sunday, June 12, 2011
Best Dad
This is a card I made for the Taylored Expressions sketch challenge this week.
My card uses The Angel Company's Just Like Dad paper collection, and Taylored Expression's Boys Will Be Boys stamp set.
Saturday, June 11, 2011
Finally got my Gypsy to work!
I'm so excited! I got a Gypsy for Christmas (to go with my Cricut), and only this week got it to work. Partly because I didn't have any time to devote to it, but mostly because every time I started, I got frustrated because the manual writers knew too well how the product worked by the time they wrote the manual, and are forgetting that most of us that have purchased the product have no idea how to make it work. I had lots of trouble with vague wording like "Cricut device" as used in "plug the Cricut device into the computer". My assumption was that Cricut device is the Cricut cutter (since I knew that had to be updated), but they meant Gypsy. When I wrote technical support to ask, and to say that no combination of cords seemed to work to plug the Cricut cutter into the computer, I got these wonderful trouble shooting tips: "plug the go into the wall, and then plug the g into the computer" What????? I can only assume that they didn't feel like writing out the word Gypsy, so they used "g", except that the second word in the sentence was supposed to mean "g" for Gyspy, not go.
When I finally figured out that the Gypsy was what was supposed to be plugged into the computer the direction was "when on the welcome screen, plug the Gypsy to the computer". Except that apparently when you have a new Gypsy, you have two welcome screens. The first is where you calibrate the machine with the stylus and then accept the terms and conditions. Then there's a second welcome screen that you get every time you turn the Gypsy on after that. So since I hadn't done anything with the machine except turn it on and plug it into the computer, without calibrating the stylus or getting the next screen, my computer kept saying it "couldn't find the device". After I accidentally bumped the Gypsy and went through he calibration and acceptance, the computer was able to find the device just fine from the second welcome screen. Ugh!
But now it works, and I have spent a little time playing with it. I created pages of stars for some cards we were going to make in the CBL class, without wasting a bunch of paper (outside of the fact that I got more stars than I needed, so you'll probably see lots of cards with stars in the next bunch of posts. Good thing it's getting near to Fourth of July.)
My favorite thing though was changing the shape of the oval that came with the George and Basic Shapes cartridge. I got the Spellbinders Fancy Tags die cut set, and found that I didn't have an oval that would go inside the one tag. I was able to change the shape of the oval to match the tag (.85 inches wide by 1.75 high). Very cool! I will have to play with it more, but now that I got it set up, I love it!
Friday, June 10, 2011
We all Punch? for Ice Cream!
Last month, I went to Rita Kegg's awesome Angelic Impressions gathering. Rita created all kinds of projects for us to do, from simple and quick cards, to things that took a little more time, but were still easy enough. We spent two creative days at beautiful Punderson Manor in Ohio, and this was the first time I've ever attended any gathering where I finished all the projects before I left!
Before the gathering, I told Rita that I would do a demonstration on punch art. I created a display board of several ideas, and then demonstrated three things. One of the things I demonstrated was an ice cream sundae in a bowl. I made an ATC card to be traded that was blank, and after the demonstration, everyone made their own ice cream to put on it, and Rita incorporated the ATC into one of the cards we made.
But even before that, I created this card that my Create-A-Bunch-At-Lunch class made.
Here are the pieces you need to punch out to make the ice cream sundae: a 1 1/2 inch circle with a crescent punched out of it by the same punch for the bowl, 2 pink 5/8 inch circles, 2 white 5/8 inch circles, 1 light brown 5/8 inch circle and 1 dark brown 5/8 inch circle. The toppings are made by putting three of the 5/8 inch circles a little more than half way into a scalloped square punch and punching. Chirstmas Red Stickles were used to make the cherries.
The circle surrounding the sundae is a Nestability die, the background is embossed with the Cuttlebug Swiss Dots embossing folder, and the sentiment is from Taylored Expressions, stamped in Noir Palette ink.
This is the card Rita created for the gathering made from my ATC trading card.
Check back later for more punch art ideas from my display board.
Tuesday, June 7, 2011
Mother's Day Flowers
This is the card I created for my Create-A-Bunch Club to make for Mother's Day. My sample also used the Rock 'N Roll technique, but because we were running short on time, they didn't bother re-inking the edges with darker colors. My inspiration for this card came from a t-shirt I saw at Kohl's.
All stamped supplies on this card are made with products from The Angel Company and all ink is Versa Magic. The lightest layer of the card background is the Damask Backgrounder stamp using Wheat ink with Sage as the edging; the second background layer uses Script Background inked with Perfect Plumeria ink; the greenery below the flowers is from the Be of Good retired hostess set, stamped in Hint of Pesto and the flowers are from the retired Fanciful Flowers set inked with Maulted Mauve with the edges rolled in Perfect Plumeria. The Happy Mother's Day sentiment is from the Trendy Greetings stamp set and is inked in Hint of Pesto.
I think this card has the most stamping layers of any card I've ever done, and is the closest I'll get to collage, since I usually don't pull collage off very well.
Sunday, June 5, 2011
Rock 'N Roll Technique on Thank You Card
This is a card I made using the rock 'n roll technique, where you load up your stamp with a lighter colored ink, and then use a second, darker, ink around the edges. This card shows the technique particularly well since I used a light blue ink for the interior and a brow ink for the edge.
This card did double duty. I used it as my project for the Madison Mingle in March and then again with my Create-A-Bunch Club in April.
The card uses The Angel Company's Damask Backgrounder stamp and the sentiment is from the Thinking of You set. The ink is Versa Magic Sea Breeze and Gingerbread.
This card did double duty. I used it as my project for the Madison Mingle in March and then again with my Create-A-Bunch Club in April.
The card uses The Angel Company's Damask Backgrounder stamp and the sentiment is from the Thinking of You set. The ink is Versa Magic Sea Breeze and Gingerbread.
Thursday, June 2, 2011
Little Art Girl
In March, a friend and I went to Ohio to visit another friend and attend the Adventures in Stamping Expo. We did LOTS of shopping and took some classes, and I helped my friends prepare for the Copic class they were giving. Amazingly enough, we also had some time to play. Not a lot, but at least a little.
While we were playing, I stamped off this image from one of my friends' stamps and colored her in. This girl reminds me of so many I know, including myself, that love to sit and draw. I haven't decided what I'm going to do with the image over all, perhaps nothing. I may just keep her in my art room as a reminder.
My little art girl is colored with Copic markers. her hair is E27, E25 & E23, her skin is E00, E000, E0000 & E11, the jeans are B34, B37 and B00 with the the colorless blender 00 to lighten, the cuffs are B34 & B91, her shoes are C3, C5, C7 & C9, the shadows are C00 and C02 and the pencils and cup are Y35, and &38.
Monday, May 30, 2011
In Honor of Our Military
I was playing with some papers this weekend to create some masculine cards for my CBL Club. One of the paper collections I was looking at was The Angel Company's Just Like Dad paper. I had a general idea in mind, and was just putting the papers together. I gave my husband the choice of several and one he picked was a camouflage paper, because he was in military mode. When I started making the card, the camo paper didn't really work, so I didn't use it. But since we were both thinking of our military, I made this card with the camo paper instead.
The stamp is one my Mom got for me from a Stamping Up party. It's colored with copic markers. Skin: E000, E00 & E01. Uniform: YG11, YG13 & YG93, Water: BOO & B95, Flag: B95 & R24. When I put it next to the paper, the colored panel looked a little too bright, so I toned it down by stippling Tim Holtz's Vintage Photo Distress Ink on it.
Labels:
Cards,
Copic Markers,
Military,
Miscellaneous,
Stampin Up
Saturday, May 28, 2011
Another Simple Sympathy
I like making simple sympathy cards because that just seems to be what's called for. This is the second card we made in the Create-A-Bunch Club in February to offset the more elaborate wine card. Unfortunately, I needed to use this card right away when my boss lost his mother.
All of the components of this card use The Angel Company products. The paper on the left border is from the Maggie paper collection, the leaves on the lower right are from the Deco Designs stamp set, stamped in Versa Magic Aloe Vera ink and the sentiment is from Savvy Sayings.
Wednesday, May 25, 2011
Friends are Like Wine
I got the inspiration for this card while blog hopping. It's completely different from the card I originally saw except for the colors and loosely, the sketch. The card I saw used flowers, but I immediately thought wine, so I played around and came up with this.
I used the card for the Create-A-Bunch Club and it's been one of the most popular to date.
The purple and green panels of the card use some old double-sided Paper Adventures paper and the brown strip is from The Angel Company's Amberly Grace collection. The grapes are from The Angel Company's retired Fancy Fruit two-step stamping set, using Versa Magic Concord Grape (what else?) ink and Palette Jardin Moss. The sentiment is from Stamping Sensations' Thoughts Just for You #1 set stamped in Palette Noir and Charcoal ink. The purple background is textured with the Diamonds in the Rough Cuttlebug embossing folder and the ovals use both the Nestabilities Large and Small Oval sets combined to make the border layer smaller.
Subscribe to:
Posts (Atom)